Saturday 27 June 2015

Cheesy French baguettes

Whenever I make bread, the shape is either that of a loaf or a "free form" which basically translates to "I have no control over the shape". So I took a piece of aluminium drain pipe (8cm diameter), cut it in half and folded it over so that I have two perfect moulds into which I could bake French-style baguettes.
The actual bread recipe is simple enough: flour (as much as you need), salt and about a tablespoon of olive oil. I added grated cheese as an alternative. To this, add yeast that has proved in a bowl with warm water and two teaspoons of sugar. Mix everything together ans slowly add more warm water until you get a soft dough. Knead until smooth, place in a bowl, cover and leave in a warm, dark place until the dough doubles in size.
Remove from bowl, punch out the air and cut into two equal pieces. Roll out into a disc (about the same size as your mould is long) and then roll it up into a cigar-shape. Place his into your mould and allow to prove again.
Bake in a hot oven and should you desire the bread to be hard and crispy on the outside, use a spray bottle with water, every few minutes.
Follow me on Instagram: johncavernelis
Check out my Facebook page: Simple Foodies


Friday 26 June 2015

Tortilla

This is a very yummy and versatile Spanish dish that can be eaten warm or cold, with or without all the extra trimmings.
What it is, in effect, is deep fried potato chips that is cooled and then combined with eggs to make a kind of omelette.
Peel potatoes and cut into small cubes. Deep fry until crispy. Remove from the oil and allow to drain and cool.
Meanwhile, take eggs (I used 5) and beat in a jug. To this I added the following: one small onion, finely diced, chopped parsley, salt, pepper, paprika and a teaspoon of baking powder. Other alternatives could be diced chorizo colorado (typical in the Spanish version) or diced ham. Really, the extras will personalise this recipe for you.
Now mix the egg mixture with the potato chips and turn out into a non-stick pan, moving around with a spatula. After a little while, the bottom of the tortilla will be "cooked" with the middle and top will be raw. Now for the tricky bit: place a plate on top of the tortilla and, holding the plate and the pan with a cloth, turn everything over. The partially cooked tortilla will now (hopefully) be in the plate. Return the pan to the heat and simply slide the tortilla back into the pan, so that the raw side is now on the bottom. Cook for a little while longer until it reaches the consistency that you desire.
In Argentina, tortilla is done in one of three ways: completely cooked, slightly moist or undercooked. A very good friend, on honeymoon in Spain, decided to ask for a tortilla undercooked or "babé" to which the waiter replied: "We have tortilla well-done or not well-done". So you choose the cooking consistency that you desire!
Follow me on Instagram: johncavernelis
Check out my Facebook page: Simple Foodies

Sunday 21 June 2015

Ciabatta

Of all the different bread types there are, ciabatta is by far my favourite. And yet I've never made any, until now, that is. By way of its ingredients, this is the simplest kind of bread, made simply with flour, yeast water and olive oil. The secret to getting it to look and feel like ciabatta has more to do with technique than anything else.
So, to start with, take three and a half cups of flour, a teaspoon of salt, a teaspoon of sugar and one and a half teaspoons of dry yeast and mix in a bowl. Now add a cup and a half of room temperature water and mix. You will have a very stick dough. Resist the urge to add more flour. Turn the dough out onto a floured surface and divide into two equal pieces. Place each piece in a bowl, cover with a cloth and leave to double in size (about an hour).
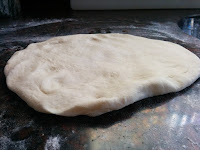
Flatten the dough out with your hand and then fold the one edge toward the middle, then the other edge, then each of the two ends. Turn over and repeat. Place this folded dough into the bowl, cover and leave for an hour. Repeat this process three times. On the third occasion, instead of returning it to the bowl, place on an oiled baking tray and allow to rise again. Bake in a medium oven until brown. During the baking process, use a water spray and moisten the bread every five minutes. This will ensure a lovely crispy exterior.
Follow me on Instagram: johncavernelis
Check out my Facebook page: Simple Foodies

Sunday 14 June 2015

Baking bread - cold rise method

Let's face it, there are few things that bring us more pleasure than the smell of freshly baked bread first thing in the morning. The only issue with that is that baking bread the conventional way could take up to two or three hours, depending on the time it takes the dough to prove. So here's a simple alternative.
Prepare your dough in the evening as you would normally, but half the amount of yeast you use. So that would be something like two to three cups of flour, a teaspoon of salt and a few tablespoons of olive oil. Mix half a packet of dry yeast in a little warm water with some sugar and add to the dry ingredients. Mix by hand until you have a soft and slightly sticky dough. Place the dough in a large bowl and cover with plastic wrap. Up till here, everything is much the same as before. Now, normally, you'd place the dough in a dark warm place to double in size for about an hour. Instead, place the bowl in the fridge and go to sleep!
The proving process will continue in the fridge, just much slower. Also, the yeast will have more time to flavour your bread. And if you're like me and you wake up at some stage in the small hours to go to the bathroom, remove the bowl from the fridge flatten it down, shape it on your baking tray and allow it to return to room temperature. Then go back to bed. By the time you wake up, your bread would have risen to the desired height and all that is left is to bake it and make a whole lot of people in your house very happy.
For this particular loaf I made this morning, I placed a tray in the bottom of the oven with water (to create steam) and every ten minutes or so I removed the bread and sprayed it with water, thereby ensuring a hard, crispy exterior. Yum!
Follow me on Instagram: johncavernelis
Check out my Facebook page: Simple Foodies

Tuesday 9 June 2015

Sausage rolls

These little delights are not at the top of my food choices simply because my kids don't like hot dogs. But they eat these, especially at birthdays.
As I mentioned in a previous post, Argentina is well-known for its empanadas and the dough is readily sold in pre-packed disks. Place these disks on your work surface and either use as is or add an ingredient to each, like mustard, cheddar cheese or ketchup. Place a vienna sausage in the middle, roll up and then cut into three pieces. These freeze very well.
Follow me on Instagram: johncavernelis
Check out my Facebook page: Simple Foodies


Grilled fish

In a country that lays so much emphasis on meat (beef), fish is somewhat of a treat and there's nothing simpler and more tasty than some oven-grilled hake.
First, take your baking tray and cover it with aluminium paper (which will prevent the fish from sticking and will make cleaning up afterwards a cinch). Pain the surface with some olive oil and place the fish fillets on top, seasoning with freshly ground black pepper and salt. I also used fresh oregano from the garden. To finish off, add a few thin slices of butter to the fish and the juice of a lemon. Bake for about five minutes (at most), depending on the thickness of the fish.
To accompany the fish (and because I had time and wanted to entertain my family), I made standard mashed potatoes and then piped them out onto the plate using an icing bag with a broad head. To complete the meal, nothing accompanies fresh fish better than a crispy green salad.
Foll me on Instagram: johncavernelis
Check out my Facebook page: Simple Foodies

Monday 8 June 2015

Simple pasta sauce

To accompany the pasta I made in the previous post I made the simplest sauce ever. Dice an onion as finely as you can, crush a clove of garlic and add both to a deep pan with some butter, salt and pepper. Fry for a few minutes, until the onions are transparent. Next, take about three bell tomatoes (in fact, any tomatoes will do) and cut into wedges, removing the seeds. Cut the skins into small cubes and add to the onion mixture, along with some basil fresh leaves.
Once this has cooked through for a few minutes, remove your pasta directly from the boiling water and add to the onion/tomato mix (along with a bit of the cooking water). Toss the two together and you're done.
Add fresh basil leaves and a drizzle of olive oil when serving, along with some grated Parmesan cheese.
Follow me on Instagram: johncavernelis
Check out my Facebook page: Simple Foodies


Sunday 7 June 2015

Making pasta

I am very aware of how easy it is to open up a packet of dry pasta or jet down to the shops and buy ready-made pasta. But when you need a bit of stress relief or even upper body exercise, there is little to replace the act of making your own pasta. And then there's the added benefit of making it the way you like with your own ingredients. Besides which, it is pathetically simple to make.
The simple rule of thumb is one normal portion of finished pasta is achieved by combining 100g of Tipo 00 cake flour to one large egg. So I used 400g of flour with 4 eggs for my family.
Pour the flour onto your work surface, make a well in the middle and crack the eggs into it. With a fork, beat the eggs. Now for the fun part: place the tips of your five fingers (one hand only) in the egg mixture and in a circular motion slowly start eroding the flour walls of the well. Very quickly you'll have a gooey mixture ... keep going and incorporate all the flour. Now for the stress relief. Start beating and pulling and knocking that mixture into a smooth-feeling ball (about five minutes). You'll feel the texture change the more you go at it.
Place this ball on a plate and cover with plastic film in the fridge for about half an hour.
Divide the ball into three pieces and, using a rolling pin, roll out as thin as you can get, always dusting with flour. Tip: to keep the flattened dough from getting away from you while you roll, have a piece hang over the edge of the work surface and lightly lean against it. Once the dough is very thin (and quite big), roll the edges up loosely toward the center so that you have two rolls. Now use a sharp knife and cut your pasta as thick or thin as you wish. When you are done, place the knife underneath and lift up and the pasta will drape down on either side of the blade. Drop onto the work surface and dust with flour. Repeat for all the balls.
This past is now ready to be cooked (be careful, fresh pasta cooks much quicker than dried pasta) or simply place in a plastic bag and freeze until needed.
Follow me on Instagram: johncavernelis
Check out my Facebook page: Simple Foodies

Friday 5 June 2015

Chicken Roll

This dish has a few steps en route to the final product but they are simple and well worth the effort, especially when the final product is placed on the table.
In effect, this is nothing more than a chicken breast that has been (carefully) beaten flat, about the size of a medium plate. To achieve this effortlessly, place the chicken breast on the (clean) work surface and cover with plastic film and rub a bit of oil on top, to make it slippery. Then, using a heavy object like a kitchen mallet or a heavy-broad-based mug, trike the chicken at an angle, so that your blow glances off it. In this way you run less of a risk of breaking the flesh.
Once the breast is more or less evenly flat, remove the film wrap and season to taste: salt, pepper, herbs, whatever takes your fancy. Now spread a thin layer of moisture over the breast (mayonnaise or mustard or BBQ sauce) about 2cm from the edge.
Next add in hard veggies cut into finger-sized sticks (celery, carrots and fennel work well) and place them in a line along the breast. Next, roll the chicken breast up, making sure to tuck the sides in.
Place the roll on aluminium paper and roll tightly, sealing as best possible. Take this roll and place it in a pot of boiling water for about five minutes.
Remove and allow to cool and then remove the aluminium paper. You will now have a white, stiff chicken roll. In a deep pan with a little oil, fry the chicken roll until crispy and brown on the outside. Cut the roll in the middle, in a diagonal line, and serve with salad.
Follow me on Instagram: johncavernelis
Check out my Facebook page: Simple Foodies